use synaptics to install eclipse
sudo su
apt-get update
apt-get upgrade
apt-get install g++
apt-get install eclipse
then follow these steps to install c++ support
If you want to add CDT (and other components) to the version of Eclipse in Ubuntu 10.04, ( which is Galileo )...
- select the "Install New Software" option of the help menu.
- click the "Add" button next to the "Work with" drop-down
- Put "Galileo" into the "Name" field - see below
- Put the Galileo release URL = "http://download.eclipse.org/releases/galileo" into the "Location" field
- Press the "OK" button to add this repository location
- Select "Galileo ... " in the "Work with" field
- Press the twisty to the left of the "Programming Languages" category
- Tick the "Eclipse C/C++ Development Tools" check-box ( should be Version 6.0.0 )
- Press the "Next" button and then "Finish" Button to install.
Galileo release URL: The Eclipse framework is released annually as a collected
and tested repository. Each release has a different name relating to celestial objects, so far moons of planets in the solar system. You should use the repository URL for the release you are using. The name is made up of "download.eclipse.org" and "/releases/galileo" in this case, but would obviously change if you used a different version of eclipse.
Tuesday, December 14, 2010
Tuesday, November 23, 2010

G++ installation without internet in Ubuntu
You can download the setup of g++ from the link given
http://rapidshare.com/files/432678133/gpp.tar.gz
After downloading uncompress the file, you can do so by right clicking on the file and selecting uncompress.
The read the readme file given in the folder
Enjoy! :)
http://rapidshare.com/files/432678133/gpp.tar.gz
After downloading uncompress the file, you can do so by right clicking on the file and selecting uncompress.
The read the readme file given in the folder
Enjoy! :)
Wednesday, November 10, 2010
Thursday, October 28, 2010
Wednesday, October 27, 2010
Wednesday, October 20, 2010
Drop Folders for Filing lab 2
Sec 1
http://drop.io/p4efa2010_sec1_lab10
pass:thisisitSec 2
http://drop.io/p4efa2010_sec2_lab10
pass: kjhu Sec 5
http://drop.io/p4efa2010_sec5_lab10
pass: sdef
Sec 6
http://drop.io/p4efa2010_sec6_lab10
pass: rhic
http://drop.io/p4efa2010_sec1_lab10
pass:thisisitSec 2
http://drop.io/p4efa2010_sec2_lab10
pass: kjhu Sec 5
http://drop.io/p4efa2010_sec5_lab10
pass: sdef
Sec 6
http://drop.io/p4efa2010_sec6_lab10
pass: rhic

Tuesday, October 19, 2010
Monday, October 18, 2010
Lab 10
/*****************************This code generates a bogus ethernet packet and sends it on the interface of your choice ********
******************************Compiling the code -> $g++ -o aha eth.cpp -lpcap *****************************************************
******************************Running the code -> $sudo ./aha ***********************************************************************/#include <stdio.h>
#include <stdlib.h>
#include <unistd.h>
#include <string.h>
#include <sys/socket.h>
#include <pcap.h>
#include <iostream>
using namespace std;
struct ETHER_HDR
{
unsigned char d_mac[6];
unsigned char s_mac[6];
unsigned char typecode[2];
} *P_EH;
struct ARP_HDR
{
//complete this struct
};
/* For future reference and for the bold who may wish to experiment
struct IP_HDR
{
unsigned char ip_ver_ihl; // 4-bit IPv4 version
// 4-bit header length (in 32-bit words)
// normally=5 Means 20 Bytes may be 24
unsigned char ip_tos; // IP type of service
unsigned short ip_total_length; // Total length
unsigned short ip_id; // Unique identifier
unsigned short ip_flag_frag_off; // Flags & Fragment offset field
unsigned char ip_ttl; // Time to live
unsigned char ip_protocol;// Protocol(TCP,UDP etc)
unsigned short ip_checksum;// IP checksum
unsigned int ip_srcaddr; // Source address
unsigned int ip_destaddr;// Source address
} *P_IPV4;
*/
//void prep_ip_hdr (u_char* pkt, IP_HDR* iph);
//Function Prototypes
void prep_ether_hdr(u_char* pkt, ETHER_HDR* eh);
void prep_ARP_hdr(u_char* pkt, ARP_HDR* eh);
int main ()
{
ETHER_HDR* eh;
//IP_HDR* iph;
pcap_if_t *alldevs;
pcap_if_t *d;
int i=0;
char errbuf[PCAP_ERRBUF_SIZE];
pcap_t * fp;
/* Retrieve the device list from the local machine */
if (pcap_findalldevs(&alldevs, errbuf) == -1)
{
cerr<<"Error in pcap_findalldevs "<<errbuf;
exit(1);
}
/* Print the list */
for(d= alldevs; d != NULL; d= d->next)
{
cout<<++i<<" "<<d->name;
if (d->description)
cout<<d->description<<endl;
else
cout<< "(No description available)\n";
}
if (i == 0)
{
cout<<"\nNo interfaces found! Make sure Pcap is installed.\n";
return 1;
}
cout<<"Enter the interface number"<< (1-i);
int inum;
cin>>inum;
if(inum < 1 || inum > i)
{
cout<<"\nInterface number out of range.\n";
/* Free the device list */
pcap_freealldevs(alldevs);
return 1;
}
for (d=alldevs, i=0; i< inum-1 ;d=d->next, i++);
fp = pcap_open_live(d->name, 65536,1,1000,errbuf); //open the device to enable sending the packet
u_char packet[100];
eh=new ETHER_HDR;
eh->d_mac[0]=255;
eh->d_mac[1]=255;
eh->d_mac[2]=255;
eh->d_mac[3]=255;
eh->d_mac[4]=255;
eh->d_mac[5]=255;
eh->s_mac[0]=2;
eh->s_mac[1]=2;
eh->s_mac[2]=2;
eh->s_mac[3]=2;
eh->s_mac[4]=2;
eh->s_mac[5]=2;
//the following will cause the payload to be interpreted as an IP protocol packet,this is the Type Code for IP 0x0800 is the type code for IP
eh->typecode[0] = 0x08;
eh->typecode[1] = 0x00;
prep_ether_hdr(packet, eh);
for (int i=14;i<100;i++)
packet[i]=i;
//iph = (struct IP_HDR*) (packet + sizeof(ETHER_HDR));
/*
iph=new IP_HDR;
iph->ip_ver_ihl = 0x45;
iph->ip_tos = 0;
iph->ip_total_length = 100 - sizeof(ETHER_HDR);
iph->ip_id = 2;
iph->ip_flag_frag_off = htons(0x4000); // 010 0000000000000 = 0 1000 0000
// 0000 0000 = 0x4000
iph->ip_ttl = 3;
iph->ip_protocol = 0x01;
iph->ip_checksum = 0;
iph->ip_srcaddr = inet_addr("192.168.1.3"); // change IP as needed
iph->ip_destaddr = inet_addr("192.168.1.2");// change IP as needed
//prep_ip_hdr(packet, iph);
*/
/* Send down the packet */
if (pcap_sendpacket(fp, packet, 100 /* size */) != 0)
{
cerr<<"\nError sending the packet: \n"<<pcap_geterr(fp);
return 0;
}
}
void prep_ether_hdr(u_char* pkt, ETHER_HDR* eh)
{
memcpy((pkt), eh->d_mac,6);
memcpy((pkt+6), eh->s_mac,6);
memcpy((pkt+12), &(eh->typecode),2);
}
void prep_ARP_hdr(u_char* pkt, ARP_HDR* eh)
{
//complete this fuction
}
//void prep_ip_hdr (u_char* pkt, IP_HDR* iph)
//{
// COMPLETE THIS FUNCTION
//}
Wednesday, October 13, 2010
Tuesday, October 12, 2010
Monday, October 11, 2010
Wednesday, October 6, 2010
Drop folders for lab 8
EL - 1
http://drop.io/p4efa2010_el1
pass: noodlesEL - 2
http://drop.io/p4efa2010_el2
pass: spaghetti EL - 5
http://drop.io/p4efa2010_el5
pass: pasta EL - 6
http://drop.io/p4efa2010_el6
pass: sawaiyaan
http://drop.io/p4efa2010_el1
pass: noodlesEL - 2
http://drop.io/p4efa2010_el2
pass: spaghetti EL - 5
http://drop.io/p4efa2010_el5
pass: pasta EL - 6
http://drop.io/p4efa2010_el6
pass: sawaiyaan
Tuesday, October 5, 2010
Saturday, October 2, 2010
Thursday, September 30, 2010
Wednesday, September 29, 2010
Late submissions
The drop folders have been opened for late submission. Any submissions made from now on will have an additional penalty. the folders will remain open till Sunday 23:59.
Tuesday, September 28, 2010
Submission deadline 12 am today
Drop folderdrop.io/dcnfa2010_sec1_lab7
pass: socketdrop.io/dcnfa2010_sec2_lab7
pass: thread drop.io/dcnfa2010_sec3_lab7
pass: pipes
pass: socketdrop.io/dcnfa2010_sec2_lab7
pass: thread drop.io/dcnfa2010_sec3_lab7
pass: pipes
Saturday, September 25, 2010
Tuesday, September 14, 2010
Monday, September 13, 2010
Updated Drop Folders
Important: Before you submit make sure the filename is your roll number. If you have multiple files compress them and rename the archive to your roll number.Sec 1 drop folder
http://www.drop.io/p4efa2010_sec1_lab6
Password: el1Sec 2 drop folder
http://www.drop.io/p4efa2010_sec2_lab6
Password: el2Sec 5 drop folder
http://www.drop.io/p4efa2010_sec5_lab6
Password: el5Sec 6 drop folder
http://www.drop.io/p4efa2010_sec6_lab6
Password: el6
Notice the naming convention, you should be able to guess the name of the submission drop for the next lab.
Updated Drop Folders
Important: Before you submit make sure the filename is your roll number. If you have multiple files compress them and rename the archive to your roll number.Sec 1 drop folder
http://www.drop.io/dcnfa2010_sec1_lab6
Password: el1Sec 2 drop folder
http://www.drop.io/dcnfa2010_sec2_lab6
Password: el2Sec 3 drop folder
http://www.drop.io/dcnfa2010_sec3_lab6
Password: el3Notice the naming convention, you should be able to guess the name of the submission drop for the next lab.
http://www.drop.io/dcnfa2010_sec1_lab6
Password: el1Sec 2 drop folder
http://www.drop.io/dcnfa2010_sec2_lab6
Password: el2Sec 3 drop folder
http://www.drop.io/dcnfa2010_sec3_lab6
Password: el3Notice the naming convention, you should be able to guess the name of the submission drop for the next lab.
Sunday, September 12, 2010
Food for thought
I had just been wondering where things start going wrong. Here is a list of courses for A-Levels.
Compare this to the subjects available at our intermediate level. Does a bell ring?
http://en.wikipedia.org/wiki/List_of_Advanced_Level_subjects
Compare this to the subjects available at our intermediate level. Does a bell ring?
http://en.wikipedia.org/wiki/List_of_Advanced_Level_subjects
Mechinical, electrical or should i become a doctor???
Firstly have a look at the following links
http://search.ucas.com/cgi-bin/hsrun/search/search/StateId/Q3MCXoiFLrmiekdjug...
http://search.ucas.com/cgi-bin/hsrun/search/search/StateId/Q3MCXoiFLrmiekdjug... Now there are two things to do:
1. Laugh about it, that they are nuts doing all these specialized courses. We dont need such education, it does not matter that we dont have technology, so what we will have what they have eventually!
2. Be concerned, we can think of nothing more than dactar, engineer or those who are left commerce or accounting. What are our career options??? With the education system that we have the best we can hope for is become a technician! Sadly even at Masters level we have course like Masters in Electrical Engineering!! WOW!!!
3. OOPs! i forgot, there is a third option too which i forgot and is i guess the most valid one. You did not get what is being talked about here. Dont worry, we after all live in a country where people find it hard to find averages! Studying, hard work, dedication and motivation is a remote concept. We dont have time to waste for all this, we have facebook to use, friends to talk to, seasons to watch, movies to download and ofcourse porn (its a fact). Why study?
And yes we have a plan for the future, loot and plunder, thats the norm of the day! I used to wonder why we are in such a state, now its obvious, we have got nothing else to do :D
Our fake sense of technological advancement
http://en.wikipedia.org/wiki/List_of_device_bandwidths here is a clue, notice the dates, latest 2008. And if you follow the trends you can figure out what must be about to come. And well here we are boasting about EVDO rev B.
I feel there are two worlds, the one we live in and the other one where for some reason people appear to have a vision and a brain. We here are slowly adjusting and adapting a 7 year old technology adsl2+. And we feel that WOW!
Coming to Iphones and all the smart phones etc. Well i think they are the biggest waste of time an money atleast the way we use it. We see no more utility of it other than watching movies where ever we go, music, facebooking, msging. How many of us use it for presentations, demonstartions or anything else useful. How many of us have any e-reader software installed?? The use we have for it i think we dont need it. So i guess it doesnot matter that we have high speed internet, all we ever do is ....
And a fact, i had been talking to a PTCL official, he seemed very pissed, he was quoting figures, almost 90% of our bamdwidth is multimedia related, movies, youtube, facebook and mostly the "p" thing! He was of the idea, is this the extent to where our brain goes??
If you have a resource use it for something useful. But sadly in our universities students dont even know how to use google!!! All the ever want is the teacher to spoon feed us. The little cute toddlers us!
Friday, September 10, 2010
Installing Virtual Box guest additions on CentOS5 and Scientific Linux 5 (x86)
First step have the proper libraries installed
Next navigate to the folder where your kernel source is located
cd into the VBox guest additions folder then run
Enjoy, you are done :)
yum install gcc-c++ kernel-devel kernel-headers
Next navigate to the folder where your kernel source is located
export KERN_DIR=/usr/src/kernels/bla bla bla
cd into the VBox guest additions folder then run
sh VBoxLinuxAdditions-x86.run
Enjoy, you are done :)
Tuesday, September 7, 2010
Our fake sense of technological advancement
http://en.wikipedia.org/wiki/List_of_device_bandwidths here is a clue, notice the dates, latest 2008. And if you follow the trends you can figure out what must be about to come. And well here we are boasting about EVDO rev B.
I feel there are two worlds, the one we live in and the other one where for some reason people appear to have a vision and a brain. We here are slowly adjusting and adapting a 7 year old technology adsl2+. And we feel that WOW!
Coming to Iphones and all the smart phones etc. Well i think they are the biggest waste of time an money atleast the way we use it. We see no more utility of it other than watching movies where ever we go, music, facebooking, msging. How many of us use it for presentations, demonstartions or anything else useful. How many of us have any e-reader software installed?? The use we have for it i think we dont need it. So i guess it doesnot matter that we have high speed internet, all we ever do is ....
And a fact, i had been talking to a PTCL official, he seemed very pissed, he was quoting figures, almost 90% of our bamdwidth is multimedia related, movies, youtube, facebook and mostly the "p" thing! He was of the idea, is this the extent to where our brain goes??
If you have a resource use it for something useful. But sadly in our universities students dont even know how to use google!!! All the ever want is the teacher to spoon feed us. The little cute toddlers us!
Mechinical, electrical or should i become a doctor???
Firstly have a look at the following links
http://search.ucas.com/cgi-bin/hsrun/search/search/StateId/Q3MCXoiFLrmiekdjug...
http://search.ucas.com/cgi-bin/hsrun/search/search/StateId/Q3MCXoiFLrmiekdjug...
Now there are two things to do:
1. Laugh about it, that they are nuts doing all these specialized courses. We dont need such education, it does not matter that we dont have technology, so what we will have what they have eventually!
2. Be concerned, we can think of nothing more than dactar, engineer or those who are left commerce or accounting. What are our career options??? With the education system that we have the best we can hope for is become a technician! Sadly even at Masters level we have course like Masters in Electrical Engineering!! WOW!!!
3. OOPs! i forgot, there is a third option too which i forgot and is i guess the most valid one. You did not get what is being talked about here. Dont worry, we after all live in a country where people find it hard to find averages! Studying, hard work, dedication and motivation is a remote concept. We dont have time to waste for all this, we have facebook to use, friends to talk to, seasons to watch, movies to download and ofcourse porn (its a fact). Why study?
And yes we have a plan for the future, loot and plunder, thats the norm of the day! I used to wonder why we are in such a state, now its obvious, we have got nothing else to do :D
http://search.ucas.com/cgi-bin/hsrun/search/search/StateId/Q3MCXoiFLrmiekdjug...
http://search.ucas.com/cgi-bin/hsrun/search/search/StateId/Q3MCXoiFLrmiekdjug...
Now there are two things to do:
1. Laugh about it, that they are nuts doing all these specialized courses. We dont need such education, it does not matter that we dont have technology, so what we will have what they have eventually!
2. Be concerned, we can think of nothing more than dactar, engineer or those who are left commerce or accounting. What are our career options??? With the education system that we have the best we can hope for is become a technician! Sadly even at Masters level we have course like Masters in Electrical Engineering!! WOW!!!
3. OOPs! i forgot, there is a third option too which i forgot and is i guess the most valid one. You did not get what is being talked about here. Dont worry, we after all live in a country where people find it hard to find averages! Studying, hard work, dedication and motivation is a remote concept. We dont have time to waste for all this, we have facebook to use, friends to talk to, seasons to watch, movies to download and ofcourse porn (its a fact). Why study?
And yes we have a plan for the future, loot and plunder, thats the norm of the day! I used to wonder why we are in such a state, now its obvious, we have got nothing else to do :D
Food for thought
I had just been wondering where things start going wrong. Here is a list of courses for A-Levels.
Compare this to the subjects available at our intermediate level. Does a bell ring?
http://en.wikipedia.org/wiki/List_of_Advanced_Level_subjects
Compare this to the subjects available at our intermediate level. Does a bell ring?
http://en.wikipedia.org/wiki/List_of_Advanced_Level_subjects
Thursday, September 2, 2010
Wednesday, September 1, 2010
Tuesday, August 31, 2010
Lab 4 - Advanced spread sheet techniques
You are to download this file. It is self explanatory. You are to supposed to reproduce this sheet. Follow all the steps mentioned and thats it for the lab. Once again as always make sure submit it online on your respective drop.
Monday, August 30, 2010
Saturday, August 28, 2010
Ubuntu Login accounts
Your login accounts have been made, you can get them from lab support. Make sure you get your passwords before you come in lab on Tuesday!
Wednesday, August 25, 2010
Lab work submission
All the labwork will be submitted online. I have created separate drops for all sections. All labwork, assignments and projects should be submitted online.
The follwoing drops have been created
Data Communication and Networks lab - El-1 www.drop.io/dcn1fa2010
Data Communication and Networks lab - El-2 www.drop.io/dcn2fa2010
The password for the guest account is 123456 for all the drops. Make sure you submit your work on your designated drop.
Submission format
You are advised to strictly follow the submission guidelines.
If you have more than one files zip them or tar them into a single archive. Rename the archive to <lab #>-<roll number> e.g. lab11-104535
Any work submitted in non-standard format will not be acceptable and will result in loss of marks.
Lab work submission
All the labwork will be submitted online. I have created separate drops for all sections. All labwork, assignments and projects should be submitted online.
The follwoing drops have been created
Programming for Engineers lab - El-1 www.drop.io/p4e1fa2010
Programming for Engineers lab - El-2 www.drop.io/p4e2fa2010
Programming for Engineers lab - El-5 www.drop.io/p4e5fa2010
Programming for Engineers lab - El-6 www.drop.io/p4e6fa2010
The password for the guest account is 123456 for all the drops. Make sure you submit your work on your designated drop.
Submission format
You are advised to strictly follow the submission guidelines.
If you have more than one files zip them or tar them into a single archive. Rename the archive to <lab #>-<roll number> e.g. lab11-104535
Any work submitted in non-standard format will not be acceptable and will result in loss of marks.
Removing Ubuntu
It is rumoured that uninstalling Ubuntu is not possible. Well the news is, it is very much possible to remove Ubuntu.
Here is how to do it.
1. Boot into windows
2. Go to control panel -> Administrative tools -> computer management -> disk management.
3. Over here select the drive on which ubuntu is installed, right click and select delete drive
4. Now you may wish to turn it into a new drive by right clicking and creating a new volume, partition logical drive etc, based upon your configuration
5. Insert a windows cd. windows xp or windows 7
6. Reboot your computer and startup select boot options (usually F12 key brings up this menu) and select boot from CD.
7. Press any key to continue
8. Now while the CD loads do not press any function key.
9. On the menu that finally appears press R to enter the recovery console
10. It will search for already installed windows
11. Select appropriate number for the windows install, usually with a single windows installation it is 1.
12. Now if asked for a password provide the administrator password. This is usually the password with which you log in or in case you dont have one then just press enter.
13. Issue the command fixmbr
14. It will give some scary warnings, at your own risk press "y" :p
15. Your done. Reboot and enjoy! :)
Sunday, August 22, 2010
My new blogs
I have made two new blogs to keep things neat and clean. The posts on all the blogs would also show up here but you may feel more comfortable visiting the individual blogs.
For Programing for Engineer students
p4e.posterous.com
For Data Communication and Network students
dcn.posterous.com
For Programing for Engineer students
p4e.posterous.com
For Data Communication and Network students
dcn.posterous.com
Otcl Tutorials
Here are a few links to Otcl tutorials
http://nile.wpi.edu/NS/otcl.html
http://www.isi.edu/nsnam/otcl/doc/tutorial.html
A full tutorial on tcl and ns2 is also attached
You can also start looking at the tutorial below, so that you are comfortable in the next lab.
Otcl and ns2
I have been receiving emails on how to run otcl code. In order to run ns2 code you need to have ns2 installed which is already installed in the lab. In case you wish to install it on your home PC's, you can refer to the following post regarding installation instructions. http://zaidmunir.blogspot.com/2010/06/installing-ns2-on-ubuntu-910.html
Friday, August 20, 2010
Ubuntu Installation - Tips and tricks
There will be a session tomorrow on Saturday 21st of August 2010 at 11 am in the auditorium. You are all invited to attend. The session will focus on various methods of installing Ubuntu on your computers and related issues. Other issues related to installation of softwares, missing drivers or issues related to networking etc. will also be discussed.
Thursday, August 19, 2010
Installing Pspice under Ubuntu
Recently i was asked if one could install Pspice under Ubuntu. Here is a post outlining a method using Wine. It looks promising, though i haven't tried it out yet http://translate.google.com/translate?hl=en&sl=fr&u=http://doc.ubuntu-fr.org/wine&ei=H5JtTJ_eNIW2vQODgam4DQ&sa=X&oi=translate&ct=result&resnum=2&ved=0CBsQ7gEwAQ&prev=/search%3Fq%3Dplayonlinux%2B%2522pspice%2522%26hl%3Den%26sa%3DG
For the tech savy
For those of you who feel Ubuntu is boring and has got nothing to offer. Well, here is a very nice article i just came across http://www.unixmen.com/linux-tutorials/937-things-to-do-after-installing-ubuntu-1004-lts-lucid-lynx
P4E-I Lab 1 & Lab 2 Fall 2010
We have covered a lot of Linux basics. Please refer to my older post for links to online tutorials and further reading http://zaidmunir.blogspot.com/2010/06/useful-links-for-learning-linux.html
Tuesday, August 17, 2010
DCN lab 2 - FALL 2010
In this lab we will be learning tcl and Otcl. The lab manual has been placed at the photocopier you are supposed to fill it up and submit it by the end of today's lab.
You can google and follow any tutorial on tcl that you wish. A list of tcl tutorials is also given here:
1. http://www.tcl.tk/man/tcl/tutorial/tcltutorial.html
2. http://users.belgacom.net/bruno.champagne/tcl.html
You can google and follow any tutorial on tcl that you wish. A list of tcl tutorials is also given here:
1. http://www.tcl.tk/man/tcl/tutorial/tcltutorial.html
2. http://users.belgacom.net/bruno.champagne/tcl.html
Monday, August 16, 2010
Sunday, August 15, 2010
Ubuntu suxs when you get to know it well! Its a nightmare
Make sure you do this
sudo dpkg-reconfigure adduser
Give "no" for an answer
Also don't forget to add this line to ~/.profile
umask 077
Then you may also want to do this
cp ~/.profile /etc/skel
this will change the default (pathetic) rights on files created by a user form 755 to 700. Note: this change will only be for users that are added after you made this change.
Or instead of changing and copying the ~./profile into etc/skel you may just simply change /etc/profile. At the end of this file you would find umask 022 change it to 077. Enjoy :)
Reference:
http://ubuntuforums.org/showpost.php?p=4461165&postcount=4
Friday, August 6, 2010
Recovering lost Ubuntu installation after installing windows
You can try installing and using Boot-repair, for instructions on installing and using it refer to the following link. (Note: i have not personally tried it but seems user friendly)
https://help.ubuntu.com/community/Boot-Repair
Or alternately you can choose to do it manually
Boot from a live cd of Ubuntu 10.04.
First, find out about your drives.
Then check to see if the drive is already mounted or not
If it is not mounted then mount it first. This is the drive in which Ubuntu is installed. In this example i will be mounting /dev/sda2 on to the folder /home/mtf
In case you are not sure which drive has Ubuntu installed, you would like to look for a drive with System field as "Linux" in the output of sudo fdisk -l
If you have multiple such drives and are confused, then you can check the drives by mounting each of them and looking at the contents to see which is which. You can mount multiple drives on different folders using the steps mentioned above. You may also mount to the same folder (not consecutively) by unmounting the former drive.In this example /dev/sda2 is unmounted and /dev/sda3 is mounted in its stead
Once the drive is mounted
Replace x with the letter for your hard disk.
In my example, /dev/sda3 is the drive with Ubuntu installation, mounted on /home/mtf so the command would be
Note that in the above case it is /dev/sda and NOT /dev/sda2
Additionally to ensure everything is in order boot into your Ubuntu and then do the following to fix any missing or malfunctioning entries in grub
https://help.ubuntu.com/community/RecoveringUbuntuAfterInstallingWindows
https://help.ubuntu.com/community/Boot-Repair
Or alternately you can choose to do it manually
Boot from a live cd of Ubuntu 10.04.
First, find out about your drives.
sudo fdisk -l
df
mkdir /home/mtf
sudo mount /dev/sda2 /home/mtf
If you have multiple such drives and are confused, then you can check the drives by mounting each of them and looking at the contents to see which is which. You can mount multiple drives on different folders using the steps mentioned above. You may also mount to the same folder (not consecutively) by unmounting the former drive.In this example /dev/sda2 is unmounted and /dev/sda3 is mounted in its stead
sudo umount /home/mtf
sudo mount /dev/sd3 /home/mtf
sudo grub-install --root-directory=/path-of-mounted-drive-with-ubuntu-install /dev/sdx
In my example, /dev/sda3 is the drive with Ubuntu installation, mounted on /home/mtf so the command would be
sudo grub-install --root-directory=/home/mtf /dev/sda
Additionally to ensure everything is in order boot into your Ubuntu and then do the following to fix any missing or malfunctioning entries in grub
sudo update-grub
https://help.ubuntu.com/community/RecoveringUbuntuAfterInstallingWindows
Tuesday, July 27, 2010
Hiberrnate, resume and restart issues in Ubuntu 10.04 : dell inspiron 1545
For those of you who are having problems with suspend and resume with your laptops using Ubuntu 10.04 here is a quick fix:
download and install uswsusp
Code:Now you can try suspend and hibernate by giving the following commands
Code:These will hopefully work. If they do not, you need to back up the following two files
Code:
Now replace the code in the following file
Code:with:
with:
To fix the restart problem:
Now
and make sure that load kexec is set to true.
Now restart your PC and enjoy :)
After following the above steps you will find that you can hibernate the PC when you click the hibernate button, but it will not hibernate once the battery runs low. For this you need to do a little bit of tweaking to make things right, first launch the global configuration editorNow navigate to apps/gnome-power-manager/general and uncheck use_time_for_policy.
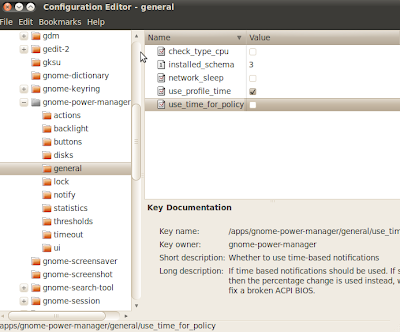
Now you may wish to manually adjust the critical battery levels. For me the defaults were a bit too low :) To do so navigate to apps/gnome-power-manager/thresholds and adjust the percentages to your liking. I have set the percentage_action to 7, percentage_critical 10 and percentage_low at 20. Now when you have tweaked to your hearts content, click on close. Enjoy :) Happy hibernating!
download and install uswsusp
Code:
sudo apt-get install uswsusp
Code:
sudo s2disk
sudo s2ram --force
Code:
sudo cp /usr/lib/hal/scripts/linux/hal-system-power-hibernate-linux /usr/lib/hal/scripts/linux/hal-system-power-hibernate-linux.bak
sudo cp /usr/lib/hal/scripts/linux/hal-system-power-suspend-linux /usr/lib/hal/scripts/linux/hal-system-power-suspend-linux.bak
Now replace the code in the following file
Code:
sudo gedit /usr/lib/hal/scripts/linux/hal-system-power-hibernate-linux
#!/bin/bash
/usr/sbin/s2disk
And the code in
sudo gedit /usr/lib/hal/scripts/linux/hal-system-power-suspend-linux
#!/bin/bash
/usr/sbin/s2ram --force
To fix the restart problem:
sudo apt-get install kexec-tools
Now
sudo gedit /etc/default/kexec
Now restart your PC and enjoy :)
After following the above steps you will find that you can hibernate the PC when you click the hibernate button, but it will not hibernate once the battery runs low. For this you need to do a little bit of tweaking to make things right, first launch the global configuration editor
gconf-editor

Now you may wish to manually adjust the critical battery levels. For me the defaults were a bit too low :) To do so navigate to apps/gnome-power-manager/thresholds and adjust the percentages to your liking. I have set the percentage_action to 7, percentage_critical 10 and percentage_low at 20. Now when you have tweaked to your hearts content, click on close. Enjoy :) Happy hibernating!
Thursday, July 22, 2010
Dell 1545 wireless and Ubuntu
As it turns out wireless network does not work on Dell 1545 in Ubuntu. Here is a simple solution
Ubuntu:
------
Go to System->Administration->Hardware Drivers
Choose the Broadcom STA wireless driver
Activate
Sometimes the driver does not show up in the Hardware Drivers choices. In
this case, try reinstalling the driver from the GUI or shell like this:
From the GUI:
Package Manager (System>Administration>Synaptic Package Manager). Click the
Reload button in the upper left corner of Synaptic to refresh your index then
search for and reinstall the package named bcmwl-kernel-source.
Code:
in case the package was not already installed try
Code:
In either GUI or text case, after reinstalling, reboot your machine.
Or you may wish to download and manually install the driver from this link http://www.broadcom.com/support/802.11/linux_sta.php
Ndiswrapper method
If you don not have luck with the above method or you have a different device then you can try the Ndiswrapper technique. A detailed walk-through is given here https://help.ubuntu.com/community/WifiDocs/Driver/Ndiswrapper. For the curious, basically Ndiswrapper allows you to install and use windows drivers on Ubuntu. Good ain't it :D
Ubuntu:
------
Go to System->Administration->Hardware Drivers
Choose the Broadcom STA wireless driver
Activate
Sometimes the driver does not show up in the Hardware Drivers choices. In
this case, try reinstalling the driver from the GUI or shell like this:
From the GUI:
Package Manager (System>Administration>Synaptic Package Manager). Click the
Reload button in the upper left corner of Synaptic to refresh your index then
search for and reinstall the package named bcmwl-kernel-source.
Code:
sudo apt-get update
sudo apt-get --reinstall install bcmwl-kernel-source
in case the package was not already installed try
Code:
sudo apt-get install bcmwl-kernel-source
In either GUI or text case, after reinstalling, reboot your machine.
Or you may wish to download and manually install the driver from this link http://www.broadcom.com/support/802.11/linux_sta.php
Ndiswrapper method
If you don not have luck with the above method or you have a different device then you can try the Ndiswrapper technique. A detailed walk-through is given here https://help.ubuntu.com/community/WifiDocs/Driver/Ndiswrapper. For the curious, basically Ndiswrapper allows you to install and use windows drivers on Ubuntu. Good ain't it :D
Tuesday, July 20, 2010
Network bridging in VirtualBox
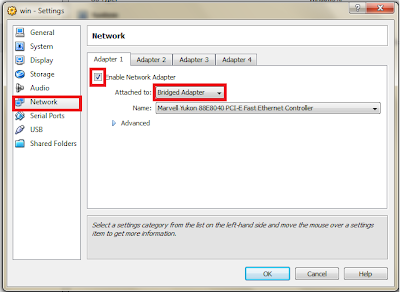
For those of you working on the ARP project you need to send and receive packets form your Ubuntu VM to the actual physical network. In order to do this you would need to setup network adapter to Bridged networking. In this mode you can sniff traffic on the actual physical network from within your VM and also inject packets into it.
Note: You should turn of Vbox DHCP server before you proceed. In order to do so follow my older post http://zaidmunir.blogspot.com/2010/07/how-to-enabledisable-virtualboxs-dhcp.html
Follow these steps for a hassle free setup.
1. Shut down VM.
2. Open its settings in VBox and goto settings->network
3. Over here click on all the adapter tabs and make sure that enable adapter is unchecked. You should only check this for the adapter you wish to use. In our case adapter 1.
4. In the 'Attached to' field select 'Bridged adapter' and in the 'name' field select the name of the adapter you want to make the bridge with.
 5. Now run your VM and find out the name for your interface using the command ifconfig. In this example it is assumed to be eth1.
6. In case the DHCP server on your local LAN physical LAN is working follow step 7 or jump to step 8.
7. Now open and edit the /etc/network/interfaces file. It should look something like this
Preview:
And now you can try pinging the host machine and machines on the physical network and all should be well :)
8. See the network settings for your host machine. Now we wish to assign the guest machine an IP which is on the same network as that of the host machine. In my case the host machine has the following configuration
Preview:
So my /etc/network/interfaces file looks something like this
Preview:
9. You will now be able to ping the host machine and others machines on the physical network. But you will still not be able to browse through the web. For this you need to make an entry for the DNS server in /etc/resolv.conf
Make the following entries in the file
Preview:
Note: the entries in your case should correspond to your particular network settings.
Note: You should turn of Vbox DHCP server before you proceed. In order to do so follow my older post http://zaidmunir.blogspot.com/2010/07/how-to-enabledisable-virtualboxs-dhcp.html
Follow these steps for a hassle free setup.
1. Shut down VM.
2. Open its settings in VBox and goto settings->network
3. Over here click on all the adapter tabs and make sure that enable adapter is unchecked. You should only check this for the adapter you wish to use. In our case adapter 1.
4. In the 'Attached to' field select 'Bridged adapter' and in the 'name' field select the name of the adapter you want to make the bridge with.
 5. Now run your VM and find out the name for your interface using the command ifconfig. In this example it is assumed to be eth1.
6. In case the DHCP server on your local LAN physical LAN is working follow step 7 or jump to step 8.
7. Now open and edit the /etc/network/interfaces file. It should look something like this
Preview:
auto lo
iface lo inet loopback

auto eth1
iface eth1 inet dynamic
And now you can try pinging the host machine and machines on the physical network and all should be well :)
8. See the network settings for your host machine. Now we wish to assign the guest machine an IP which is on the same network as that of the host machine. In my case the host machine has the following configuration
Preview:
IP 172.16.1.10
subnet 255.255.0.0
default gateway 172.16.1.1
DNS 172.16.1.1
So my /etc/network/interfaces file looks something like this
Preview:
auto lo
iface lo inet loopback

auto eth1
iface eth1 inet static
address 172.16.1.103
netmask    255.255.0.0
gateway 172.16.1.1
9. You will now be able to ping the host machine and others machines on the physical network. But you will still not be able to browse through the web. For this you need to make an entry for the DNS server in /etc/resolv.conf
Make the following entries in the file
Preview:
search com
nameserver 172.16.1.1
Note: the entries in your case should correspond to your particular network settings.
An inspiring video
You should watch this video, what he says makes sense, try to relate to it.
http://www.youtube.com/watch?v=OLN2k0b3g70&feature=related
http://www.youtube.com/watch?v=OLN2k0b3g70&feature=related
Sunday, July 18, 2010
Networking lab
For this lab you will need this manual. Its hard copy has been placed at the photocopier. You are to submit a hard copy at the end of the lab.
All help material has been posted on the blog here.
All help material has been posted on the blog here.
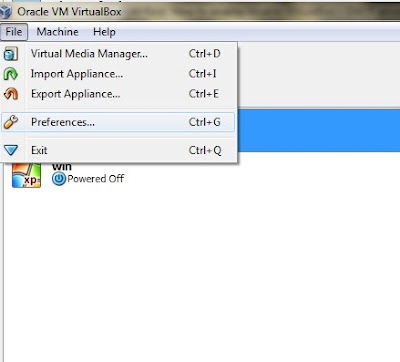
How to enable/disable VirtualBox's DHCP server.
Goto File -> Preferences -> Network
Now select the VirtualBox Host-only Ethernet adapter and edit it as shown below, then in the DHCP server tab un-check Enable server.

Now press OK twice and you should theoretically be done, but due to a bug in VBox the DHCP is not truly disabled till the time you restart the host machine (The machine on which VBox is running).
Saturday, July 17, 2010
Configuring network interfaces in Ubuntu
As a first step you should know which interfaces are configured in your machine. You can start by listing all the interfaces using the command: ifconfig
eth1 Link encap:Ethernet HWaddr 08:00:27:31:34:d7
inet addr:10.0.2.15 Bcast:10.0.2.255 Mask:255.255.255.0
inet6 addr: fe80::a00:27ff:fe31:34d7/64 Scope:Link
UP BROADCAST RUNNING MULTICAST MTU:1500 Metric:1
RX packets:1100 errors:0 dropped:0 overruns:0 frame:0
TX packets:1089 errors:0 dropped:0 overruns:0 carrier:0
collisions:0 txqueuelen:1000
RX bytes:970170 (970.1 KB) TX bytes:181886 (181.8 KB)
eth2 Link encap:Ethernet HWaddr 08:00:27:96:82:41
UP BROADCAST MULTICAST MTU:1500 Metric:1
RX packets:0 errors:0 dropped:0 overruns:0 frame:0
TX packets:0 errors:0 dropped:0 overruns:0 carrier:0
collisions:0 txqueuelen:1000
RX bytes:0 (0.0 B) TX bytes:0 (0.0 B)
eth2:avahi Link encap:Ethernet HWaddr 08:00:27:96:82:41
inet addr:169.254.6.94 Bcast:169.254.255.255 Mask:255.255.0.0
UP BROADCAST MULTICAST MTU:1500 Metric:1
lo Link encap:Local Loopback
inet addr:127.0.0.1 Mask:255.0.0.0
inet6 addr: ::1/128 Scope:Host
UP LOOPBACK RUNNING MTU:16436 Metric:1
RX packets:4 errors:0 dropped:0 overruns:0 frame:0
TX packets:4 errors:0 dropped:0 overruns:0 carrier:0
collisions:0 txqueuelen:0
RX bytes:240 (240.0 B) TX bytes:240 (240.0 B)
In the output observe the first column it contains the interface name. You need to know which interface you wish to configure. I would be configuring eth2 in the rest that follows, you can replace eth2 by an interface of your choice.
In Ubuntu the main file in which all the network configuration is /etc/network/interfaces.
Before you start editing system files its a good practice to take back up, in case you screw something up, you can restore the file using the backed up file. You can back up the file by using the following command:
sudo cp interfaces interfaces.bak
First, what if you want to make an interface acquire a dynamic configuration using DHCP. in that case open the /etc/network/interfaces using your favorite editor. Note: In order to make changes to this file you need to be an administrator. To do this you need to use the sudo prefix:
sudo gedit /etc/network/interfaces
Look for an entry for the interface on which you wish to use DHCP. If there is one remove it and then add the following:
auto eth2
iface eth2 inet dhcp
Now you need to restart the network. Use the following command:
sudo /etc/init.d/networking restart
Part 2: What if you wish to assign a static configuration to the interface.
Once again open the file /etc/network/interfaces and search for the interface of your choice. Remove all the entries for it below the line auto eth2 (be careful not to remove the configuration for other interfaces). In my case I wish to have the following configuration
Desired new sample settings:
=> Host IP address 192.168.1.100
=> Netmask: 255.255.255.0
=> Network ID: 192.168.1.0
=> Broadcast IP: 192.168.1.255
=> Gateway/Router IP: 192.168.1.254
=> DNS Server: 192.168.1.254
Add the following lines to the file
auto eth2
Once more, now you need to restart networking. For this use the same command as above: sudo /etc/init.d/networking restart
If you want a more advanced tutorial you can follow http://www.cyberciti.biz/tips/howto-ubuntu-linux-convert-dhcp-network-configuration-to-static-ip-configuration.html
eth1 Link encap:Ethernet HWaddr 08:00:27:31:34:d7
inet addr:10.0.2.15 Bcast:10.0.2.255 Mask:255.255.255.0
inet6 addr: fe80::a00:27ff:fe31:34d7/64 Scope:Link
UP BROADCAST RUNNING MULTICAST MTU:1500 Metric:1
RX packets:1100 errors:0 dropped:0 overruns:0 frame:0
TX packets:1089 errors:0 dropped:0 overruns:0 carrier:0
collisions:0 txqueuelen:1000
RX bytes:970170 (970.1 KB) TX bytes:181886 (181.8 KB)
eth2 Link encap:Ethernet HWaddr 08:00:27:96:82:41
UP BROADCAST MULTICAST MTU:1500 Metric:1
RX packets:0 errors:0 dropped:0 overruns:0 frame:0
TX packets:0 errors:0 dropped:0 overruns:0 carrier:0
collisions:0 txqueuelen:1000
RX bytes:0 (0.0 B) TX bytes:0 (0.0 B)
eth2:avahi Link encap:Ethernet HWaddr 08:00:27:96:82:41
inet addr:169.254.6.94 Bcast:169.254.255.255 Mask:255.255.0.0
UP BROADCAST MULTICAST MTU:1500 Metric:1
lo Link encap:Local Loopback
inet addr:127.0.0.1 Mask:255.0.0.0
inet6 addr: ::1/128 Scope:Host
UP LOOPBACK RUNNING MTU:16436 Metric:1
RX packets:4 errors:0 dropped:0 overruns:0 frame:0
TX packets:4 errors:0 dropped:0 overruns:0 carrier:0
collisions:0 txqueuelen:0
RX bytes:240 (240.0 B) TX bytes:240 (240.0 B)
In the output observe the first column it contains the interface name. You need to know which interface you wish to configure. I would be configuring eth2 in the rest that follows, you can replace eth2 by an interface of your choice.
In Ubuntu the main file in which all the network configuration is /etc/network/interfaces.
Before you start editing system files its a good practice to take back up, in case you screw something up, you can restore the file using the backed up file. You can back up the file by using the following command:
sudo cp interfaces interfaces.bak
First, what if you want to make an interface acquire a dynamic configuration using DHCP. in that case open the /etc/network/interfaces using your favorite editor. Note: In order to make changes to this file you need to be an administrator. To do this you need to use the sudo prefix:
sudo gedit /etc/network/interfaces
Look for an entry for the interface on which you wish to use DHCP. If there is one remove it and then add the following:
auto eth2
iface eth2 inet dhcp
Now you need to restart the network. Use the following command:
sudo /etc/init.d/networking restart
Part 2: What if you wish to assign a static configuration to the interface.
Once again open the file /etc/network/interfaces and search for the interface of your choice. Remove all the entries for it below the line auto eth2 (be careful not to remove the configuration for other interfaces). In my case I wish to have the following configuration
Desired new sample settings:
=> Host IP address 192.168.1.100
=> Netmask: 255.255.255.0
=> Network ID: 192.168.1.0
=> Broadcast IP: 192.168.1.255
=> Gateway/Router IP: 192.168.1.254
=> DNS Server: 192.168.1.254
Add the following lines to the file
auto eth2
iface eth2 inet static
       address 192.168.1.100
       netmask 255.255.255.0
       network 192.168.1.0
       broadcast 192.168.1.255
       gateway 192.168.1.254
Once more, now you need to restart networking. For this use the same command as above: sudo /etc/init.d/networking restart
If you want a more advanced tutorial you can follow http://www.cyberciti.biz/tips/howto-ubuntu-linux-convert-dhcp-network-configuration-to-static-ip-configuration.html
Subscribe to:
Posts (Atom)