You should watch this video, what he says makes sense, try to relate to it.
http://www.youtube.com/watch?v=OLN2k0b3g70&feature=related
Tuesday, July 20, 2010
Sunday, July 18, 2010
Networking lab
For this lab you will need this manual. Its hard copy has been placed at the photocopier. You are to submit a hard copy at the end of the lab.
All help material has been posted on the blog here.
All help material has been posted on the blog here.
How to enable/disable VirtualBox's DHCP server.
Goto File -> Preferences -> Network
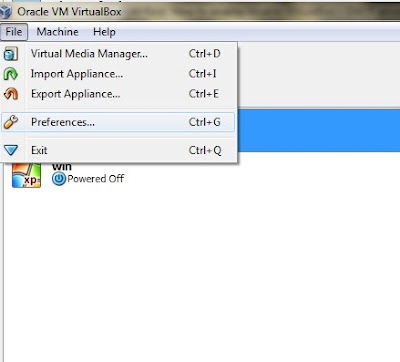
Now select the VirtualBox Host-only Ethernet adapter and edit it as shown below, then in the DHCP server tab un-check Enable server.

Now press OK twice and you should theoretically be done, but due to a bug in VBox the DHCP is not truly disabled till the time you restart the host machine (The machine on which VBox is running).
Saturday, July 17, 2010
Configuring network interfaces in Ubuntu
As a first step you should know which interfaces are configured in your machine. You can start by listing all the interfaces using the command: ifconfig
eth1 Link encap:Ethernet HWaddr 08:00:27:31:34:d7
inet addr:10.0.2.15 Bcast:10.0.2.255 Mask:255.255.255.0
inet6 addr: fe80::a00:27ff:fe31:34d7/64 Scope:Link
UP BROADCAST RUNNING MULTICAST MTU:1500 Metric:1
RX packets:1100 errors:0 dropped:0 overruns:0 frame:0
TX packets:1089 errors:0 dropped:0 overruns:0 carrier:0
collisions:0 txqueuelen:1000
RX bytes:970170 (970.1 KB) TX bytes:181886 (181.8 KB)
eth2 Link encap:Ethernet HWaddr 08:00:27:96:82:41
UP BROADCAST MULTICAST MTU:1500 Metric:1
RX packets:0 errors:0 dropped:0 overruns:0 frame:0
TX packets:0 errors:0 dropped:0 overruns:0 carrier:0
collisions:0 txqueuelen:1000
RX bytes:0 (0.0 B) TX bytes:0 (0.0 B)
eth2:avahi Link encap:Ethernet HWaddr 08:00:27:96:82:41
inet addr:169.254.6.94 Bcast:169.254.255.255 Mask:255.255.0.0
UP BROADCAST MULTICAST MTU:1500 Metric:1
lo Link encap:Local Loopback
inet addr:127.0.0.1 Mask:255.0.0.0
inet6 addr: ::1/128 Scope:Host
UP LOOPBACK RUNNING MTU:16436 Metric:1
RX packets:4 errors:0 dropped:0 overruns:0 frame:0
TX packets:4 errors:0 dropped:0 overruns:0 carrier:0
collisions:0 txqueuelen:0
RX bytes:240 (240.0 B) TX bytes:240 (240.0 B)
In the output observe the first column it contains the interface name. You need to know which interface you wish to configure. I would be configuring eth2 in the rest that follows, you can replace eth2 by an interface of your choice.
In Ubuntu the main file in which all the network configuration is /etc/network/interfaces.
Before you start editing system files its a good practice to take back up, in case you screw something up, you can restore the file using the backed up file. You can back up the file by using the following command:
sudo cp interfaces interfaces.bak
First, what if you want to make an interface acquire a dynamic configuration using DHCP. in that case open the /etc/network/interfaces using your favorite editor. Note: In order to make changes to this file you need to be an administrator. To do this you need to use the sudo prefix:
sudo gedit /etc/network/interfaces
Look for an entry for the interface on which you wish to use DHCP. If there is one remove it and then add the following:
auto eth2
iface eth2 inet dhcp
Now you need to restart the network. Use the following command:
sudo /etc/init.d/networking restart
Part 2: What if you wish to assign a static configuration to the interface.
Once again open the file /etc/network/interfaces and search for the interface of your choice. Remove all the entries for it below the line auto eth2 (be careful not to remove the configuration for other interfaces). In my case I wish to have the following configuration
Desired new sample settings:
=> Host IP address 192.168.1.100
=> Netmask: 255.255.255.0
=> Network ID: 192.168.1.0
=> Broadcast IP: 192.168.1.255
=> Gateway/Router IP: 192.168.1.254
=> DNS Server: 192.168.1.254
Add the following lines to the file
auto eth2
Once more, now you need to restart networking. For this use the same command as above: sudo /etc/init.d/networking restart
If you want a more advanced tutorial you can follow http://www.cyberciti.biz/tips/howto-ubuntu-linux-convert-dhcp-network-configuration-to-static-ip-configuration.html
eth1 Link encap:Ethernet HWaddr 08:00:27:31:34:d7
inet addr:10.0.2.15 Bcast:10.0.2.255 Mask:255.255.255.0
inet6 addr: fe80::a00:27ff:fe31:34d7/64 Scope:Link
UP BROADCAST RUNNING MULTICAST MTU:1500 Metric:1
RX packets:1100 errors:0 dropped:0 overruns:0 frame:0
TX packets:1089 errors:0 dropped:0 overruns:0 carrier:0
collisions:0 txqueuelen:1000
RX bytes:970170 (970.1 KB) TX bytes:181886 (181.8 KB)
eth2 Link encap:Ethernet HWaddr 08:00:27:96:82:41
UP BROADCAST MULTICAST MTU:1500 Metric:1
RX packets:0 errors:0 dropped:0 overruns:0 frame:0
TX packets:0 errors:0 dropped:0 overruns:0 carrier:0
collisions:0 txqueuelen:1000
RX bytes:0 (0.0 B) TX bytes:0 (0.0 B)
eth2:avahi Link encap:Ethernet HWaddr 08:00:27:96:82:41
inet addr:169.254.6.94 Bcast:169.254.255.255 Mask:255.255.0.0
UP BROADCAST MULTICAST MTU:1500 Metric:1
lo Link encap:Local Loopback
inet addr:127.0.0.1 Mask:255.0.0.0
inet6 addr: ::1/128 Scope:Host
UP LOOPBACK RUNNING MTU:16436 Metric:1
RX packets:4 errors:0 dropped:0 overruns:0 frame:0
TX packets:4 errors:0 dropped:0 overruns:0 carrier:0
collisions:0 txqueuelen:0
RX bytes:240 (240.0 B) TX bytes:240 (240.0 B)
In the output observe the first column it contains the interface name. You need to know which interface you wish to configure. I would be configuring eth2 in the rest that follows, you can replace eth2 by an interface of your choice.
In Ubuntu the main file in which all the network configuration is /etc/network/interfaces.
Before you start editing system files its a good practice to take back up, in case you screw something up, you can restore the file using the backed up file. You can back up the file by using the following command:
sudo cp interfaces interfaces.bak
First, what if you want to make an interface acquire a dynamic configuration using DHCP. in that case open the /etc/network/interfaces using your favorite editor. Note: In order to make changes to this file you need to be an administrator. To do this you need to use the sudo prefix:
sudo gedit /etc/network/interfaces
Look for an entry for the interface on which you wish to use DHCP. If there is one remove it and then add the following:
auto eth2
iface eth2 inet dhcp
Now you need to restart the network. Use the following command:
sudo /etc/init.d/networking restart
Part 2: What if you wish to assign a static configuration to the interface.
Once again open the file /etc/network/interfaces and search for the interface of your choice. Remove all the entries for it below the line auto eth2 (be careful not to remove the configuration for other interfaces). In my case I wish to have the following configuration
Desired new sample settings:
=> Host IP address 192.168.1.100
=> Netmask: 255.255.255.0
=> Network ID: 192.168.1.0
=> Broadcast IP: 192.168.1.255
=> Gateway/Router IP: 192.168.1.254
=> DNS Server: 192.168.1.254
Add the following lines to the file
auto eth2
iface eth2 inet static
       address 192.168.1.100
       netmask 255.255.255.0
       network 192.168.1.0
       broadcast 192.168.1.255
       gateway 192.168.1.254
Once more, now you need to restart networking. For this use the same command as above: sudo /etc/init.d/networking restart
If you want a more advanced tutorial you can follow http://www.cyberciti.biz/tips/howto-ubuntu-linux-convert-dhcp-network-configuration-to-static-ip-configuration.html
Libpcap in Ubuntu
You can begin by downloading and installing a new Ubuntu VM. Follow my older post for instructions regarding the installation http://zaidmunir.blogspot.com/2010/06/ubuntu-installation-on-virtual-box.html.
Once you are done installing you will need to download and install the libpcap development libraries. In case you need to find them your self, you can use the command to list possible matches:
aptitude search libpcap
You need to install the libpcap-dev package, for this use the command:
sudo apt-get install libpcap-dev
Friday, July 16, 2010
Proxy server
For those who are working on the proxy server project. Here is a link hopefully the proxy wont block this :)
Making ARP packets
In order to successfully make your ARP request packet, you need to understand the ARP header. You need to declare an appropriate structure for it in your code. Be advised, the ARP header follows immediately after the Ethernet header.
There had been some confusion regarding the values of different fields, please refer to the following screen shot if in confusion. You should be very clear that in order to broadcast the packet on layer 2, you need to adjust the destination MAC in the Ethernet header only, whereas for the value regarding destination hardware address in ARP header, pay special attention to the field destination MAC address in the ARP header in the image attached.

 Also observe the total number of bytes received/captured. You will also need to adjust this value accordingly in your code when you send down the packet, you would need to adjust the parameters of pcap_sendpacket (...) accordingly. Refer to my older post for the code related part.
Subscribe to:
Posts (Atom)