For those of you working on the ARP project you need to send and receive packets form your Ubuntu VM to the actual physical network. In order to do this you would need to setup network adapter to Bridged networking. In this mode you can sniff traffic on the actual physical network from within your VM and also inject packets into it.
Note: You should turn of Vbox DHCP server before you proceed. In order to do so follow my older post http://zaidmunir.blogspot.com/2010/07/how-to-enabledisable-virtualboxs-dhcp.html
Follow these steps for a hassle free setup.
1. Shut down VM.
2. Open its settings in VBox and goto settings->network
3. Over here click on all the adapter tabs and make sure that enable adapter is unchecked. You should only check this for the adapter you wish to use. In our case adapter 1.
4. In the 'Attached to' field select 'Bridged adapter' and in the 'name' field select the name of the adapter you want to make the bridge with.
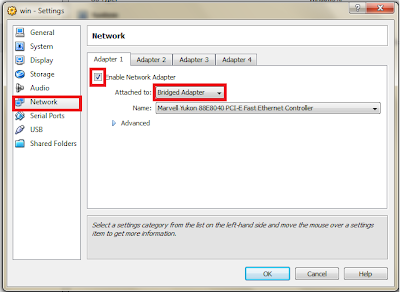 5. Now run your VM and find out the name for your interface using the command ifconfig. In this example it is assumed to be eth1.
6. In case the DHCP server on your local LAN physical LAN is working follow step 7 or jump to step 8.
7. Now open and edit the /etc/network/interfaces file. It should look something like this
Preview:
And now you can try pinging the host machine and machines on the physical network and all should be well :)
8. See the network settings for your host machine. Now we wish to assign the guest machine an IP which is on the same network as that of the host machine. In my case the host machine has the following configuration
Preview:
So my /etc/network/interfaces file looks something like this
Preview:
9. You will now be able to ping the host machine and others machines on the physical network. But you will still not be able to browse through the web. For this you need to make an entry for the DNS server in /etc/resolv.conf
Make the following entries in the file
Preview:
Note: the entries in your case should correspond to your particular network settings.
Note: You should turn of Vbox DHCP server before you proceed. In order to do so follow my older post http://zaidmunir.blogspot.com/2010/07/how-to-enabledisable-virtualboxs-dhcp.html
Follow these steps for a hassle free setup.
1. Shut down VM.
2. Open its settings in VBox and goto settings->network
3. Over here click on all the adapter tabs and make sure that enable adapter is unchecked. You should only check this for the adapter you wish to use. In our case adapter 1.
4. In the 'Attached to' field select 'Bridged adapter' and in the 'name' field select the name of the adapter you want to make the bridge with.
 5. Now run your VM and find out the name for your interface using the command ifconfig. In this example it is assumed to be eth1.
6. In case the DHCP server on your local LAN physical LAN is working follow step 7 or jump to step 8.
7. Now open and edit the /etc/network/interfaces file. It should look something like this
Preview:
auto lo
iface lo inet loopback

auto eth1
iface eth1 inet dynamic
And now you can try pinging the host machine and machines on the physical network and all should be well :)
8. See the network settings for your host machine. Now we wish to assign the guest machine an IP which is on the same network as that of the host machine. In my case the host machine has the following configuration
Preview:
IP 172.16.1.10
subnet 255.255.0.0
default gateway 172.16.1.1
DNS 172.16.1.1
So my /etc/network/interfaces file looks something like this
Preview:
auto lo
iface lo inet loopback

auto eth1
iface eth1 inet static
address 172.16.1.103
netmask    255.255.0.0
gateway 172.16.1.1
9. You will now be able to ping the host machine and others machines on the physical network. But you will still not be able to browse through the web. For this you need to make an entry for the DNS server in /etc/resolv.conf
Make the following entries in the file
Preview:
search com
nameserver 172.16.1.1
Note: the entries in your case should correspond to your particular network settings.


 Also observe the total number of bytes received/captured. You will also need to adjust this value accordingly in your code when you send down the packet, you would need to adjust the parameters of pcap_sendpacket (...) accordingly. Refer to my