Pages

Showing posts with label virtual box. Show all posts

Friday, September 10, 2010

Installing Virtual Box guest additions on CentOS5 and Scientific Linux 5 (x86)

First step have the proper libraries installed

yum install gcc-c++ kernel-devel kernel-headers

Next navigate to the folder where your kernel source is located

export KERN_DIR=/usr/src/kernels/bla bla bla

cd into the VBox guest additions folder then run

sh VBoxLinuxAdditions-x86.run

Enjoy, you are done :)

Tuesday, July 20, 2010

Network bridging in VirtualBox

For those of you working on the ARP project you need to send and receive packets form your Ubuntu VM to the actual physical network. In order to do this you would need to setup network adapter to Bridged networking. In this mode you can sniff traffic on the actual physical network from within your VM and also inject packets into it.

Note: You should turn of Vbox DHCP server before you proceed. In order to do so follow my older post http://zaidmunir.blogspot.com/2010/07/how-to-enabledisable-virtualboxs-dhcp.html

Follow these steps for a hassle free setup.
1. Shut down VM.
2. Open its settings in VBox and goto settings->network
3. Over here click on all the adapter tabs and make sure that enable adapter is unchecked. You should only check this for the adapter you wish to use. In our case adapter 1.
4. In the 'Attached to' field select 'Bridged adapter' and in the 'name' field select the name of the adapter you want to make the bridge with.
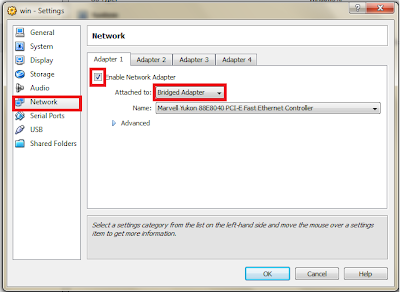
5. Now run your VM and find out the name for your interface using the command ifconfig. In this example it is assumed to be eth1.
6. In case the DHCP server on your local LAN physical LAN is working follow step 7 or jump to step 8.
7. Now open and edit the /etc/network/interfaces file. It should look something like this

Preview:

auto lo
iface lo inet loopback

auto eth1
iface eth1 inet dynamic

And now you can try pinging the host machine and machines on the physical network and all should be well :)

8. See the network settings for your host machine. Now we wish to assign the guest machine an IP which is on the same network as that of the host machine. In my case the host machine has the following configuration

Preview:

IP 172.16.1.10
subnet 255.255.0.0
default gateway 172.16.1.1
DNS 172.16.1.1

So my /etc/network/interfaces file looks something like this

Preview:

auto lo
iface lo inet loopback

auto eth1
iface eth1 inet static
address 172.16.1.103
netmask 255.255.0.0
gateway 172.16.1.1

9. You will now be able to ping the host machine and others machines on the physical network. But you will still not be able to browse through the web. For this you need to make an entry for the DNS server in /etc/resolv.conf

Make the following entries in the file

Preview:

search com
nameserver 172.16.1.1


Note: the entries in your case should correspond to your particular network settings.

Sunday, July 18, 2010

Networking lab

For this lab you will need this manual. Its hard copy has been placed at the photocopier. You are to submit a hard copy at the end of the lab.

All help material has been posted on the blog here.

How to enable/disable VirtualBox's DHCP server.

Goto File -> Preferences -> Network


Now select the VirtualBox Host-only Ethernet adapter and edit it as shown below, then in the DHCP server tab un-check Enable server.


Now press OK twice and you should theoretically be done, but due to a bug in VBox the DHCP is not truly disabled till the time you restart the host machine (The machine on which VBox is running).

Saturday, July 17, 2010

Libpcap in Ubuntu

You can begin by downloading and installing a new Ubuntu VM. Follow my older post for instructions regarding the installation http://zaidmunir.blogspot.com/2010/06/ubuntu-installation-on-virtual-box.html.
Once you are done installing you will need to download and install the libpcap development libraries. In case you need to find them your self, you can use the command to list possible matches:

aptitude search libpcap

You need to install the libpcap-dev package, for this use the command:

sudo apt-get install libpcap-dev

Thursday, July 15, 2010

Creating multiple virtual disk images for virtual box

If for some reason you want to run multiple instances of the same OS in virtual box, you need not install it multiple times on new virtual hard disks. Rather, you can create images of the VHD (virtual hard disk) which you can use for you new VM's. This article is primarily for windows, i have added notes for Linux users where appropriate.
1. In order to do this navigate to the folder where you have installed virtual box through command line. In windows you can launch command prompt by typing cmd in run and pressing enter. (In Linux VBoxManage command is in bin folder and hence its path is set, it can be launched directly from terminal by typing VBoxManage)
1.5. Before you proceed launch VBox. Goto File -> Virtual media manager.
       release the image you wish to clone. then also remove it. Make sure you do not delete the image when asked.

2. Next in this folder you will find the file VBoxManage.exe, you need to execute it with the following parameters.
3. VBoxManage clonehd [path of VhD to clone] [path + name of new clone VHD]
4. After this you should have a new VHD in the folder you specified. You can create a new VM in Virtual Box and use this clone hard disk in it. Enjoy :)

Tuesday, July 13, 2010

Configuring network in virtual box

Please download this manual, it will be helpful in revising your previous concepts.
You additionally need to download and print this manual, you need to submit a filled hard copy at the end of the lab.

Here you can additionally find the link to the online tutorial for virtual box, in this section virtual networking is explained http://www.virtualbox.org/manual/ch06.html
And here is another useful link for changing the IP address in Ubuntu, be advised before you make any changes to these files be sure to take backup of this file.

Monday, June 28, 2010

Setting up a shared folder in virtual box, windows host , ubuntu guest

You might be wondering if there is any way of getting your data from the virtual disk into your real machine or vice-versa, tension not, it is very easy. All you need to do is set up a shared folder. In order to do this follow the following easy steps.
  1. Go to virtual machine settings and select the shared folders tab.
  2. Now add the path of the folder you want to share and give a name to it, this will be used in your Ubuntu VM machine. Note: if you add the Desktop folder with its default name, i.e. "Desktop" you will not be able to set up sharing, this is some bug, so i recommend changing the folder name to "shared" or something else.
  3. Also check make permanent if you wish to use the folder again after reboot :)
  4. Now make a folder in which to map the shared folder e.g "mkdir ~/Desktop/share"
  5. now use the following command "sudo mount -t vboxsf share ~/Desktop/home" where share is the name of the shared folder you gave in virtual machine settings and ~/Desktop/share is the path where you wish to map the shared folder.
  6. Or you may edit the /etc/fstab file and put the following line in the end of it"share /home/username/Desktop vboxsf auto 0 0" notice here the ~ wont work, so you need to give the full path, and the last two arguments are zero not alphabet 'o'.
  7. Now open the folder and enjoy.

Notes:
  1. The Ubuntu folder that you are mapping to must be empty
  2. If you are already in the shared folder, it wont show any files, you need to cd back into the folder to be able to see the files.

Monday, May 31, 2010

Ubuntu 10.4

Well Ubuntu's latest version has failed to impress me so far. The very first time i got on with some business i had to face some bugs :s. I use it on a virtual box. I tried mounting the shared folder and each time it gave me a stupid error, "invalid arguments", i reinstalled Vbox Guest additions all in vain. Went through lot and lots of posts and still no use. Guess what the problem was?? For some reason it did not like the share folder name which was "Desktop", i simply changed it to abc and there it was, DONE!
Ubunutu 10.4 fails to impress me so far. My general feeling about it, its for people who are new to linux and want an OS full of Shashka's, instant PM's and social networking bla bla bla....