There will be a session tomorrow on Saturday 21st of August 2010 at 11 am in the auditorium. You are all invited to attend. The session will focus on various methods of installing Ubuntu on your computers and related issues. Other issues related to installation of softwares, missing drivers or issues related to networking etc. will also be discussed.
Showing posts with label Data Communications and Networks. Show all posts
Showing posts with label Data Communications and Networks. Show all posts
Friday, August 20, 2010


Tuesday, August 17, 2010
DCN lab 2 - FALL 2010
In this lab we will be learning tcl and Otcl. The lab manual has been placed at the photocopier you are supposed to fill it up and submit it by the end of today's lab.
You can google and follow any tutorial on tcl that you wish. A list of tcl tutorials is also given here:
1. http://www.tcl.tk/man/tcl/tutorial/tcltutorial.html
2. http://users.belgacom.net/bruno.champagne/tcl.html
You can google and follow any tutorial on tcl that you wish. A list of tcl tutorials is also given here:
1. http://www.tcl.tk/man/tcl/tutorial/tcltutorial.html
2. http://users.belgacom.net/bruno.champagne/tcl.html
Tuesday, July 20, 2010
Network bridging in VirtualBox
For those of you working on the ARP project you need to send and receive packets form your Ubuntu VM to the actual physical network. In order to do this you would need to setup network adapter to Bridged networking. In this mode you can sniff traffic on the actual physical network from within your VM and also inject packets into it.
Note: You should turn of Vbox DHCP server before you proceed. In order to do so follow my older post http://zaidmunir.blogspot.com/2010/07/how-to-enabledisable-virtualboxs-dhcp.html
Follow these steps for a hassle free setup.
1. Shut down VM.
2. Open its settings in VBox and goto settings->network
3. Over here click on all the adapter tabs and make sure that enable adapter is unchecked. You should only check this for the adapter you wish to use. In our case adapter 1.
4. In the 'Attached to' field select 'Bridged adapter' and in the 'name' field select the name of the adapter you want to make the bridge with.
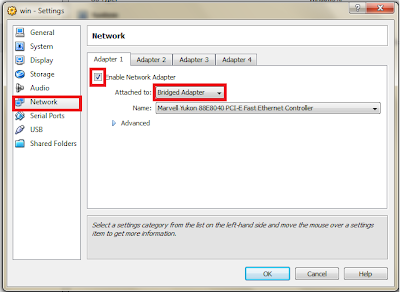 5. Now run your VM and find out the name for your interface using the command ifconfig. In this example it is assumed to be eth1.
6. In case the DHCP server on your local LAN physical LAN is working follow step 7 or jump to step 8.
7. Now open and edit the /etc/network/interfaces file. It should look something like this
Preview:
And now you can try pinging the host machine and machines on the physical network and all should be well :)
8. See the network settings for your host machine. Now we wish to assign the guest machine an IP which is on the same network as that of the host machine. In my case the host machine has the following configuration
Preview:
So my /etc/network/interfaces file looks something like this
Preview:
9. You will now be able to ping the host machine and others machines on the physical network. But you will still not be able to browse through the web. For this you need to make an entry for the DNS server in /etc/resolv.conf
Make the following entries in the file
Preview:
Note: the entries in your case should correspond to your particular network settings.
Note: You should turn of Vbox DHCP server before you proceed. In order to do so follow my older post http://zaidmunir.blogspot.com/2010/07/how-to-enabledisable-virtualboxs-dhcp.html
Follow these steps for a hassle free setup.
1. Shut down VM.
2. Open its settings in VBox and goto settings->network
3. Over here click on all the adapter tabs and make sure that enable adapter is unchecked. You should only check this for the adapter you wish to use. In our case adapter 1.
4. In the 'Attached to' field select 'Bridged adapter' and in the 'name' field select the name of the adapter you want to make the bridge with.
 5. Now run your VM and find out the name for your interface using the command ifconfig. In this example it is assumed to be eth1.
6. In case the DHCP server on your local LAN physical LAN is working follow step 7 or jump to step 8.
7. Now open and edit the /etc/network/interfaces file. It should look something like this
Preview:
auto lo
iface lo inet loopback

auto eth1
iface eth1 inet dynamic
And now you can try pinging the host machine and machines on the physical network and all should be well :)
8. See the network settings for your host machine. Now we wish to assign the guest machine an IP which is on the same network as that of the host machine. In my case the host machine has the following configuration
Preview:
IP 172.16.1.10
subnet 255.255.0.0
default gateway 172.16.1.1
DNS 172.16.1.1
So my /etc/network/interfaces file looks something like this
Preview:
auto lo
iface lo inet loopback

auto eth1
iface eth1 inet static
address 172.16.1.103
netmask    255.255.0.0
gateway 172.16.1.1
9. You will now be able to ping the host machine and others machines on the physical network. But you will still not be able to browse through the web. For this you need to make an entry for the DNS server in /etc/resolv.conf
Make the following entries in the file
Preview:
search com
nameserver 172.16.1.1
Note: the entries in your case should correspond to your particular network settings.
Sunday, July 18, 2010
Networking lab
For this lab you will need this manual. Its hard copy has been placed at the photocopier. You are to submit a hard copy at the end of the lab.
All help material has been posted on the blog here.
All help material has been posted on the blog here.
How to enable/disable VirtualBox's DHCP server.
Goto File -> Preferences -> Network
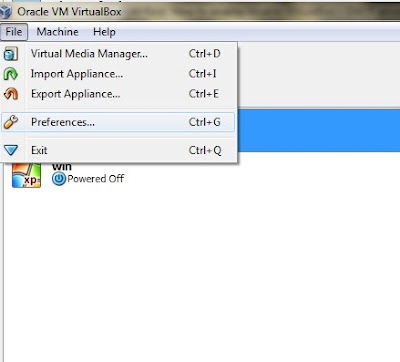
Now select the VirtualBox Host-only Ethernet adapter and edit it as shown below, then in the DHCP server tab un-check Enable server.

Now press OK twice and you should theoretically be done, but due to a bug in VBox the DHCP is not truly disabled till the time you restart the host machine (The machine on which VBox is running).

Now select the VirtualBox Host-only Ethernet adapter and edit it as shown below, then in the DHCP server tab un-check Enable server.

Now press OK twice and you should theoretically be done, but due to a bug in VBox the DHCP is not truly disabled till the time you restart the host machine (The machine on which VBox is running).
Saturday, July 17, 2010
Configuring network interfaces in Ubuntu
As a first step you should know which interfaces are configured in your machine. You can start by listing all the interfaces using the command: ifconfig
eth1 Link encap:Ethernet HWaddr 08:00:27:31:34:d7
inet addr:10.0.2.15 Bcast:10.0.2.255 Mask:255.255.255.0
inet6 addr: fe80::a00:27ff:fe31:34d7/64 Scope:Link
UP BROADCAST RUNNING MULTICAST MTU:1500 Metric:1
RX packets:1100 errors:0 dropped:0 overruns:0 frame:0
TX packets:1089 errors:0 dropped:0 overruns:0 carrier:0
collisions:0 txqueuelen:1000
RX bytes:970170 (970.1 KB) TX bytes:181886 (181.8 KB)
eth2 Link encap:Ethernet HWaddr 08:00:27:96:82:41
UP BROADCAST MULTICAST MTU:1500 Metric:1
RX packets:0 errors:0 dropped:0 overruns:0 frame:0
TX packets:0 errors:0 dropped:0 overruns:0 carrier:0
collisions:0 txqueuelen:1000
RX bytes:0 (0.0 B) TX bytes:0 (0.0 B)
eth2:avahi Link encap:Ethernet HWaddr 08:00:27:96:82:41
inet addr:169.254.6.94 Bcast:169.254.255.255 Mask:255.255.0.0
UP BROADCAST MULTICAST MTU:1500 Metric:1
lo Link encap:Local Loopback
inet addr:127.0.0.1 Mask:255.0.0.0
inet6 addr: ::1/128 Scope:Host
UP LOOPBACK RUNNING MTU:16436 Metric:1
RX packets:4 errors:0 dropped:0 overruns:0 frame:0
TX packets:4 errors:0 dropped:0 overruns:0 carrier:0
collisions:0 txqueuelen:0
RX bytes:240 (240.0 B) TX bytes:240 (240.0 B)
In the output observe the first column it contains the interface name. You need to know which interface you wish to configure. I would be configuring eth2 in the rest that follows, you can replace eth2 by an interface of your choice.
In Ubuntu the main file in which all the network configuration is /etc/network/interfaces.
Before you start editing system files its a good practice to take back up, in case you screw something up, you can restore the file using the backed up file. You can back up the file by using the following command:
sudo cp interfaces interfaces.bak
First, what if you want to make an interface acquire a dynamic configuration using DHCP. in that case open the /etc/network/interfaces using your favorite editor. Note: In order to make changes to this file you need to be an administrator. To do this you need to use the sudo prefix:
sudo gedit /etc/network/interfaces
Look for an entry for the interface on which you wish to use DHCP. If there is one remove it and then add the following:
auto eth2
iface eth2 inet dhcp
Now you need to restart the network. Use the following command:
sudo /etc/init.d/networking restart
Part 2: What if you wish to assign a static configuration to the interface.
Once again open the file /etc/network/interfaces and search for the interface of your choice. Remove all the entries for it below the line auto eth2 (be careful not to remove the configuration for other interfaces). In my case I wish to have the following configuration
Desired new sample settings:
=> Host IP address 192.168.1.100
=> Netmask: 255.255.255.0
=> Network ID: 192.168.1.0
=> Broadcast IP: 192.168.1.255
=> Gateway/Router IP: 192.168.1.254
=> DNS Server: 192.168.1.254
Add the following lines to the file
auto eth2
Once more, now you need to restart networking. For this use the same command as above: sudo /etc/init.d/networking restart
If you want a more advanced tutorial you can follow http://www.cyberciti.biz/tips/howto-ubuntu-linux-convert-dhcp-network-configuration-to-static-ip-configuration.html
eth1 Link encap:Ethernet HWaddr 08:00:27:31:34:d7
inet addr:10.0.2.15 Bcast:10.0.2.255 Mask:255.255.255.0
inet6 addr: fe80::a00:27ff:fe31:34d7/64 Scope:Link
UP BROADCAST RUNNING MULTICAST MTU:1500 Metric:1
RX packets:1100 errors:0 dropped:0 overruns:0 frame:0
TX packets:1089 errors:0 dropped:0 overruns:0 carrier:0
collisions:0 txqueuelen:1000
RX bytes:970170 (970.1 KB) TX bytes:181886 (181.8 KB)
eth2 Link encap:Ethernet HWaddr 08:00:27:96:82:41
UP BROADCAST MULTICAST MTU:1500 Metric:1
RX packets:0 errors:0 dropped:0 overruns:0 frame:0
TX packets:0 errors:0 dropped:0 overruns:0 carrier:0
collisions:0 txqueuelen:1000
RX bytes:0 (0.0 B) TX bytes:0 (0.0 B)
eth2:avahi Link encap:Ethernet HWaddr 08:00:27:96:82:41
inet addr:169.254.6.94 Bcast:169.254.255.255 Mask:255.255.0.0
UP BROADCAST MULTICAST MTU:1500 Metric:1
lo Link encap:Local Loopback
inet addr:127.0.0.1 Mask:255.0.0.0
inet6 addr: ::1/128 Scope:Host
UP LOOPBACK RUNNING MTU:16436 Metric:1
RX packets:4 errors:0 dropped:0 overruns:0 frame:0
TX packets:4 errors:0 dropped:0 overruns:0 carrier:0
collisions:0 txqueuelen:0
RX bytes:240 (240.0 B) TX bytes:240 (240.0 B)
In the output observe the first column it contains the interface name. You need to know which interface you wish to configure. I would be configuring eth2 in the rest that follows, you can replace eth2 by an interface of your choice.
In Ubuntu the main file in which all the network configuration is /etc/network/interfaces.
Before you start editing system files its a good practice to take back up, in case you screw something up, you can restore the file using the backed up file. You can back up the file by using the following command:
sudo cp interfaces interfaces.bak
First, what if you want to make an interface acquire a dynamic configuration using DHCP. in that case open the /etc/network/interfaces using your favorite editor. Note: In order to make changes to this file you need to be an administrator. To do this you need to use the sudo prefix:
sudo gedit /etc/network/interfaces
Look for an entry for the interface on which you wish to use DHCP. If there is one remove it and then add the following:
auto eth2
iface eth2 inet dhcp
Now you need to restart the network. Use the following command:
sudo /etc/init.d/networking restart
Part 2: What if you wish to assign a static configuration to the interface.
Once again open the file /etc/network/interfaces and search for the interface of your choice. Remove all the entries for it below the line auto eth2 (be careful not to remove the configuration for other interfaces). In my case I wish to have the following configuration
Desired new sample settings:
=> Host IP address 192.168.1.100
=> Netmask: 255.255.255.0
=> Network ID: 192.168.1.0
=> Broadcast IP: 192.168.1.255
=> Gateway/Router IP: 192.168.1.254
=> DNS Server: 192.168.1.254
Add the following lines to the file
auto eth2
iface eth2 inet static
       address 192.168.1.100
       netmask 255.255.255.0
       network 192.168.1.0
       broadcast 192.168.1.255
       gateway 192.168.1.254
Once more, now you need to restart networking. For this use the same command as above: sudo /etc/init.d/networking restart
If you want a more advanced tutorial you can follow http://www.cyberciti.biz/tips/howto-ubuntu-linux-convert-dhcp-network-configuration-to-static-ip-configuration.html
Libpcap in Ubuntu
You can begin by downloading and installing a new Ubuntu VM. Follow my older post for instructions regarding the installation http://zaidmunir.blogspot.com/2010/06/ubuntu-installation-on-virtual-box.html.
Once you are done installing you will need to download and install the libpcap development libraries. In case you need to find them your self, you can use the command to list possible matches:
aptitude search libpcap
You need to install the libpcap-dev package, for this use the command:
sudo apt-get install libpcap-dev
Once you are done installing you will need to download and install the libpcap development libraries. In case you need to find them your self, you can use the command to list possible matches:
aptitude search libpcap
You need to install the libpcap-dev package, for this use the command:
sudo apt-get install libpcap-dev
Friday, July 16, 2010
Proxy server
For those who are working on the proxy server project. Here is a link hopefully the proxy wont block this :)
Making ARP packets
In order to successfully make your ARP request packet, you need to understand the ARP header. You need to declare an appropriate structure for it in your code. Be advised, the ARP header follows immediately after the Ethernet header.
There had been some confusion regarding the values of different fields, please refer to the following screen shot if in confusion. You should be very clear that in order to broadcast the packet on layer 2, you need to adjust the destination MAC in the Ethernet header only, whereas for the value regarding destination hardware address in ARP header, pay special attention to the field destination MAC address in the ARP header in the image attached.

 Also observe the total number of bytes received/captured. You will also need to adjust this value accordingly in your code when you send down the packet, you would need to adjust the parameters of pcap_sendpacket (...) accordingly. Refer to my older post for the code related part.
Software router
For those students working on software router, you need to be able to capture packets coming on the interface and analyze them as a first step towards your goal. This link is a useful resource.
You should especially look into this.
You should especially look into this.
Thursday, July 15, 2010
Creating multiple virtual disk images for virtual box
If for some reason you want to run multiple instances of the same OS in virtual box, you need not install it multiple times on new virtual hard disks. Rather, you can create images of the VHD (virtual hard disk) which you can use for you new VM's. This article is primarily for windows, i have added notes for Linux users where appropriate.
1. In order to do this navigate to the folder where you have installed virtual box through command line. In windows you can launch command prompt by typing cmd in run and pressing enter. (In Linux VBoxManage command is in bin folder and hence its path is set, it can be launched directly from terminal by typing VBoxManage)
1.5. Before you proceed launch VBox. Goto File -> Virtual media manager.
release the image you wish to clone. then also remove it. Make sure you do not delete the image when asked.
2. Next in this folder you will find the file VBoxManage.exe, you need to execute it with the following parameters.
3. VBoxManage clonehd [path of VhD to clone] [path + name of new clone VHD]
4. After this you should have a new VHD in the folder you specified. You can create a new VM in Virtual Box and use this clone hard disk in it. Enjoy :)
1. In order to do this navigate to the folder where you have installed virtual box through command line. In windows you can launch command prompt by typing cmd in run and pressing enter. (In Linux VBoxManage command is in bin folder and hence its path is set, it can be launched directly from terminal by typing VBoxManage)
1.5. Before you proceed launch VBox. Goto File -> Virtual media manager.
release the image you wish to clone. then also remove it. Make sure you do not delete the image when asked.
2. Next in this folder you will find the file VBoxManage.exe, you need to execute it with the following parameters.
3. VBoxManage clonehd
Wednesday, July 14, 2010
Libpcap
I have written a small sample code to get you started. You can download it here. to compile the code: gcc code.c -lpcap
and then execute the output file as: sudo ./a.out
Here is a code which generates an ICMP packet, you should follow the structure given in this code. Compile and run the code as mentioned above.
and then execute the output file as: sudo ./a.out
Here is a code which generates an ICMP packet, you should follow the structure given in this code. Compile and run the code as mentioned above.
Tuesday, July 13, 2010
Configuring network in virtual box
Please download this manual, it will be helpful in revising your previous concepts.
You additionally need to download and print this manual, you need to submit a filled hard copy at the end of the lab.
Here you can additionally find the link to the online tutorial for virtual box, in this section virtual networking is explained http://www.virtualbox.org/manual/ch06.html
And here is another useful link for changing the IP address in Ubuntu, be advised before you make any changes to these files be sure to take backup of this file.
You additionally need to download and print this manual, you need to submit a filled hard copy at the end of the lab.
Here you can additionally find the link to the online tutorial for virtual box, in this section virtual networking is explained http://www.virtualbox.org/manual/ch06.html
And here is another useful link for changing the IP address in Ubuntu, be advised before you make any changes to these files be sure to take backup of this file.
Sunday, July 4, 2010
Tips for socket programming lab2
1. Important point you can only type cast a pointer into another, it implies that you can not type cast an integer to the type void * etc.
2. The last argument of the thread function takes a void pointer as its argument so firstly keep point 1 in mind and secondly either you can declare a pointer or the better option might be to simply pass the variable by reference.
3. If you passed a variable by reference don't forget to dereference it. syntax * referenced_variable
5. Enjoy your programming, its never too late to learn :)
2. The last argument of the thread function takes a void pointer as its argument so firstly keep point 1 in mind and secondly either you can declare a pointer or the better option might be to simply pass the variable by reference.
3. If you passed a variable by reference don't forget to dereference it. syntax * referenced_variable
5. Enjoy your programming, its never too late to learn :)
Friday, July 2, 2010
iostream buffer issues, cin, cout, cin.get, cin.getline
Here are useful links to iostream buffer related issues.
http://www.cplusplus.com/forum/beginner/7405/
http://www.cs.hmc.edu/~geoff/classes/hmc.cs070.200109/notes/io.html
you may also wish to read the chapter on I/O in the book by Walter Savitch, it is available in the library
In case you are having issues where your code seems to skip cin or cin.getline you can use
std::cin.ignore(std::numeric_limits::max(),'\n');
or, since you have 'using namespace std;', you can add this
cin.ignore(numeric_limits::max(),'\n');
to flush the buffer before you take input you will need to include ios.h and limits.h in order for it to work
sample
# include
# include
# include
# include
using namespace std;
int main()
{
.
.
.
.
.
string string1;
cin.ignore(numeric_limits::max(),'\n');
cin.getline(cin,string1);
}
http://www.cplusplus.com/forum/beginner/7405/
http://www.cs.hmc.edu/~geoff/classes/hmc.cs070.200109/notes/io.html
you may also wish to read the chapter on I/O in the book by Walter Savitch, it is available in the library
In case you are having issues where your code seems to skip cin or cin.getline you can use
std::cin.ignore(std::numeric_limits
or, since you have 'using namespace std;', you can add this
cin.ignore(numeric_limits
to flush the buffer before you take input you will need to include ios.h and limits.h in order for it to work
sample
# include
# include
# include
# include
using namespace std;
int main()
{
.
.
.
.
.
string string1;
cin.ignore(numeric_limits
cin.getline(cin,string1);
}
Thursday, July 1, 2010
Multi threading
You should download this sample file. You can compile this code using g++ -lpthread filename .A tutorial on threading is available at http://www.yolinux.com/TUTORIALS/LinuxTutorialPosixThreads.html.
Wednesday, June 30, 2010
Socket Programming
Here are a few helpful links for those who wish to learn socket programming.
http://www.tenouk.com/cnlinuxsockettutorials.html start from ch 1 and continue further, there is no end to iy, it all depends on how much you wish to learn. :)
For those of you who are getting jumpy and dont want to go through the details this page lists the details of the functions and there parameters that are being used. http://www.tenouk.com/Module39b.html
You can download and run the client and server executables to see what output is expected from you.
http://www.tenouk.com/cnlinuxsockettutorials.html start from ch 1 and continue further, there is no end to iy, it all depends on how much you wish to learn. :)
For those of you who are getting jumpy and dont want to go through the details this page lists the details of the functions and there parameters that are being used. http://www.tenouk.com/Module39b.html
You can download and run the client and server executables to see what output is expected from you.
Monday, June 28, 2010
Setting up a shared folder in virtual box, windows host , ubuntu guest
You might be wondering if there is any way of getting your data from the virtual disk into your real machine or vice-versa, tension not, it is very easy. All you need to do is set up a shared folder. In order to do this follow the following easy steps.
- Go to virtual machine settings and select the shared folders tab.
- Now add the path of the folder you want to share and give a name to it, this will be used in your Ubuntu VM machine. Note: if you add the Desktop folder with its default name, i.e. "Desktop" you will not be able to set up sharing, this is some bug, so i recommend changing the folder name to "shared" or something else.
- Also check make permanent if you wish to use the folder again after reboot :)
- Now make a folder in which to map the shared folder e.g "mkdir ~/Desktop/share"
- now use the following command "sudo mount -t vboxsf share ~/Desktop/home" where share is the name of the shared folder you gave in virtual machine settings and ~/Desktop/share is the path where you wish to map the shared folder.
- Or you may edit the /etc/fstab file and put the following line in the end of it"share /home/username/Desktop vboxsf auto 0 0" notice here the ~ wont work, so you need to give the full path, and the last two arguments are zero not alphabet 'o'.
- Now open the folder and enjoy.
Notes:
- The Ubuntu folder that you are mapping to must be empty
- If you are already in the shared folder, it wont show any files, you need to cd back into the folder to be able to see the files.
Sunday, June 27, 2010
DCN lab make files
In order to do the lab you need these files
you will additionally need these files too, keep these files safe they will be used in the next lab too.
If you need additional help you can refer to my previous post http://zaidmunir.blogspot.com/2010/06/useful-links-for-learning-linux.html
you will additionally need these files too, keep these files safe they will be used in the next lab too.
If you need additional help you can refer to my previous post http://zaidmunir.blogspot.com/2010/06/useful-links-for-learning-linux.html
Installing ns-2 for multiple users
There are a few tips that might save you considerable time and irritation if you follow them.
- Firstly, never install ns-2 in the home folder, make a folder at "/" for installing applications, for instance "/Apps" in this case.
- Installing for multiple users is no big deal, just install it like you would for a single user, if you are looking for Ubuntu install instructions you can refer to my earlier post http://zaidmunir.blogspot.com/2010/06/installing-ns2-on-ubuntu-910.html you just need to prefix the commands mentioned in the link with a sudo :)
- After installing it just make a minor change, instead of making changes to the ~./bashrc file make the same changes to /etc/bash.bashrc if you are using Ubuntu or /etc/bashrc for other flavours of Linux.
- Now go the user which is most probably a "desktop user" you can switch environments without having to log off using the command "su username -" and enter password when prompted for it. Now you would be in the username's environment. now if you run ns-2 it would run but when you run the validation checks, it would fail. This is because the folder that you created at root does not have write privileges by default. You can change this issuing the command "sudo chmod -Rf +w /Apps/ns-allinone-2.34" or you can use "sudo chmod -Rf 777 /Apps/ns-allinone-2.34" this would cause the specified folder and its subfolder to have wrx permissions for all users.
- Now you can run the validation tests and in a while you should get an all tests passed message. Whola, you are ready to go. By following this method all the users can run ns-2 without any issue. :)
Subscribe to:
Posts (Atom)